USB-C ecosystem for iPhone and iPad: cables, hubs, drives, and adapters that work without nasty surprises
USB-C on iPhone and iPad has made everyday setups simpler, but it has also created a new kind of confusion: two cables can look identical and behave completely differently. In 2026, most “it doesn’t charge”, “my iPhone can’t see the drive”, or “the mic isn’t working” complaints come down to mismatched standards, underpowered accessories, or the wrong combination of hub + storage + format.
This guide is written from a practical point of view: what to buy, how to check it, and how to build a USB-C kit that behaves predictably with iPhone and iPad. I’ll focus on real scenarios—photo/video offload, study, work, and travel—so you can avoid spending money twice.
How to choose a USB-C cable that actually matches your needs
The first thing to understand is that USB-C is only the connector shape. Inside, a cable may support charging only, basic USB 2 data, faster USB 3 data, or even Thunderbolt on certain iPad models. That’s why two cables with the same plug can give you wildly different results.
On iPhone, the data speed you can get depends on the model. Standard iPhone 15/16 models are limited to USB 2 speeds (up to 480 Mb/s), while Pro models can use USB 3 speeds (up to 10 Gb/s) when paired with a compatible cable. The key detail is that the cable included in the box can still be a USB 2-grade cable, even if your iPhone supports faster transfer—so you may need a separate USB 3-rated cable for high-speed work.
For charging, look for USB Power Delivery (USB-PD) support. A cable rated for 60 W (3 A) is usually enough for iPhone and most iPad charging, while 100 W (5 A) is the safer choice if you also power a hub and charge an iPad Pro at the same time. If the packaging doesn’t clearly state PD support and a wattage rating, treat it as a risk for anything beyond basic phone charging.
How to tell “charge-only” from a proper data cable in real life
The most reliable method is checking the printed spec on the cable or packaging: “USB 2.0” means up to 480 Mb/s, while “USB 3.2 Gen 2” or “10Gbps” means it’s designed for faster data. If the listing says only “fast charging” with no data mention, assume it’s either charge-only or USB 2 at best.
A simple home test also helps. Connect iPhone (or iPad) to a computer and try transferring a large file. If you’re using an iPhone Pro model that supports USB 3 speeds and you still see slow transfers, the cable is the bottleneck. This is especially important for people moving ProRes video from iPhone Pro to SSD—USB 2 makes that workflow painfully slow.
Finally, pay attention to cable thickness and length. Very long USB-C cables are more likely to be limited to USB 2 or unstable at higher speeds unless they’re explicitly rated. For a dependable travel kit, a short 0.5–1 m USB-C cable with a clear 10Gbps label is typically the most predictable option for data work.
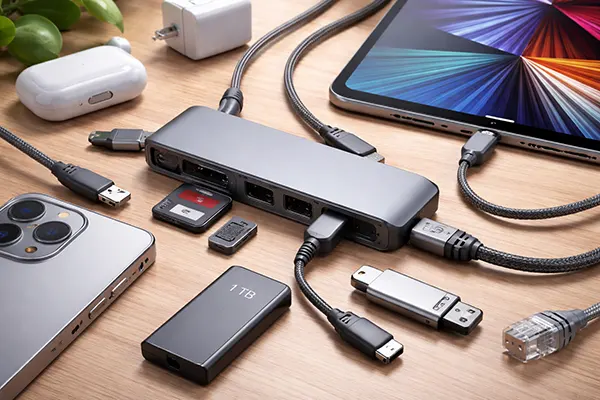
USB-C hubs for iPad: what matters (and what usually breaks first)
iPad is where hubs make the biggest difference, because you can turn a tablet into a real work device: external display, SD card import, wired audio gear, Ethernet, and charging—often at the same time. The problem is that many hubs are built for laptops and don’t behave as well with iPad power limits and iPadOS requirements.
Start with the ports you actually need. For most people, the “core” set is: USB-C Power Delivery input, at least one USB-A port for accessories, HDMI for a monitor, and an SD/microSD slot for camera media. If you work with video or large photo libraries, add a hub with USB-C data passthrough (not just charging) or a dedicated high-speed USB-C port for SSD use.
Power is the silent deal-breaker. If you connect an SSD, HDMI, and charge the iPad through the same hub, a weak PD input can cause random drive disconnects or display flicker. In practice, a hub with PD input plus a decent USB-PD charger is the difference between “stable workstation” and “why does this keep dropping?”. For travel, it’s worth using one charger that can comfortably power the whole chain rather than relying on a small phone charger.
HDMI, SD, and power: the checklist for a hub that behaves properly
For HDMI, the “4K” label is not enough. You want clear support statements such as 4K@60Hz if you plan to use modern monitors. If you only need slides and general work, 4K@30Hz may be fine, but it can feel less smooth for daily use. Also make sure the hub has a strong physical connector—loose USB-C plugs are a common reason for monitor dropouts.
For SD cards, check whether the hub supports UHS-I or UHS-II. Many hubs claim “fast SD” but only provide basic speeds, which can turn importing 100 GB of footage into an unnecessary wait. If you shoot on modern cameras, a hub with a proper UHS-II reader is a real quality-of-life upgrade.
For charging passthrough, choose a hub that supports USB-PD and pair it with a charger that exceeds what your iPad needs. If your iPad typically uses a 20–30 W charger, consider using a 45–65 W charger when also powering accessories through the hub. The extra headroom helps keep storage and video output stable when everything is connected at once.
External drives on iPhone and iPad: SSDs, flash drives, and formats that won’t fail mid-task
In 2026, using external storage with iPhone and iPad is normal: SSDs for video, flash drives for quick sharing, and card readers for cameras. Most failures happen for three reasons: insufficient power, incompatible file system, or a hub that can’t deliver stable power/data simultaneously.
File format matters more than people expect. iPadOS can work with common formats like APFS, ExFAT, and FAT/MS-DOS via the Files app, and modern iPadOS versions even allow formatting external drives from iPad itself in many cases. For cross-device work with Windows and Android, ExFAT is usually the safest choice. For Apple-only workflows, APFS is generally more robust and efficient—especially for SSDs.
Power requirements are the other big piece. A portable SSD that works perfectly on a Mac can fail on an iPad if it draws too much power or if the hub can’t feed it cleanly. If you see disconnects, the fix is often not a new drive, but adding proper PD power into the hub or using a lower-power SSD enclosure. With iPhone, the safest approach is a powered USB-C hub for SSD use, especially for long transfers or video capture workflows.
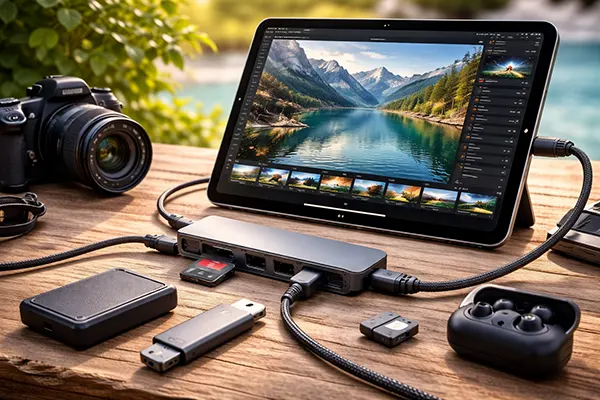
Real scenarios: photo/video, study, work, and travel setups that stay reliable
Photo/video offload: For SD cards, a quality SD reader or a hub with a strong SD slot is the simplest route. If you work with large files, moving footage directly to an SSD can be faster, but only if the drive is formatted sensibly (often ExFAT for compatibility) and the hub is powered. This prevents the classic “drive disconnects halfway through import” situation.
Study and office work: The most reliable minimal kit is: one PD charger, one USB-C hub with HDMI + USB-A + PD input, and one short, well-rated USB-C cable. That combination supports a monitor, keyboard/mouse dongle if needed, and charging—without requiring constant re-plugging. Add a small flash drive only if you frequently exchange files offline; otherwise cloud + Files app sharing is often enough.
Travel: Stability comes from reducing variables. A compact hub with PD input, a single higher-power charger, and one proven cable is better than carrying five random cables. If you need storage on the move, a small low-power SSD is usually safer than a cheap flash drive. For iPhone Pro video workflows, a short 10Gbps-rated cable plus a powered hub is the combination that avoids most surprises.
Related articles
-
 iPhone 17e vs Used iPhone 16 Pro: Whi...
Choosing between a brand-new mid-range iPhone and a previously owned …
-
 MacBook for Study and Office in 2026:...
Choosing a MacBook for study or office work in 2026 …
-
 Mac for Media Work in 2026: How to Ch...
Choosing a Mac for professional media work in 2026 is …